Spell Bait Control (Deck Guide)
Deck Strategy
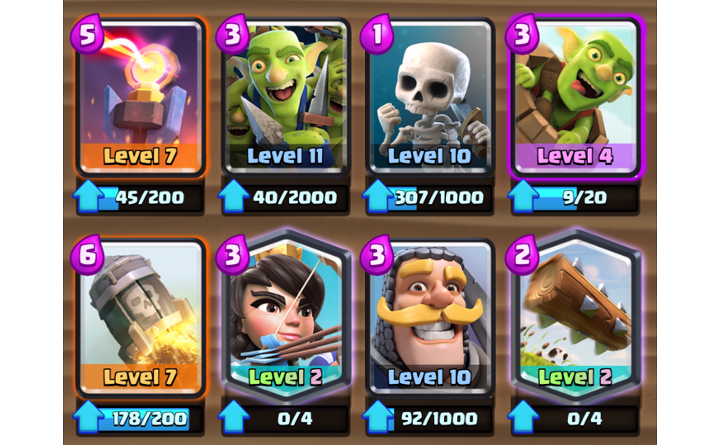
This Spell Bait deck is a control deck at heart. It’s often going to win 1-0 in overtime. The deck is aiming to counter opponents’ threats as efficiently as possible while building up small counter attacks that chip away at their arena towers.“Spell Baiting”
The deck uses a critical mass of “spell bait” cards. These cards are VERY effective on rate, but can be easily countered by the Log (or similar spells). Many opponents will only have 1 or 2 spells like that in their deck, and you’ll be looking to overwhelm those answers. For example, if they log your Goblin Barrel for +1 elixir but now they can’t protect their eBarb push from your Goblin Gang, you end up at +2 elixir.Goblin Barrel
 The goblin barrel is the most iconic card of this list. It can sail over your enemies defenses to drop 3 goblins directly on their tower, and they all begin attacking immediately.
Usually you’ll want to use it when you’re up on elixir to get in some chip damage on a tower, but it can also be used defensively in a pinch.
At tourney standards, an undefended goblin barrel can already do almost 30% of a crown tower’s hitpoints. When paired with a tank, an unaddressed barrel will quickly and easily take down a crown tower.
Princess
The Princess is an extremely versatile card, and she does it all in this list. She’s a great opener behind your castle against an unknown opponent, and you’ll find yourself using her for pretty everything listed below over the course of a match –
- Clearing swarms – skeleton armies and goblin gangs will vanish in a flash, and she’s the best answer to a minion horde in the deck
- Supporting troops – she can deal a ton of damage over a long fight if you’ve gummed up your opponents’ troops, even when placed out of collateral damage range
- Split pushing – a Princess at the opposite bridge is a threat that needs to be answered soon, and will pull vital resources away from your opponent’s push
- Chipping towers – either right at the bridge or after finishing one of the jobs above
- Spell baiting – she demands a response quickly or she’s going to do tons of work
Rocket

The rocket is a high cost spell that does huge amounts of damage on impact. It travels slowly and has a small hit radius, so it takes practice to use right, but the payoff can be enormous.
As long as you can get to 6 elixir, the rocket can be a get-out-of-jail-free card for difficult pushes that could’ve otherwise rolled over your towers, and in general can just be used for positive elixir trades if you can get the timing right. Look at some possible scenarios –
- Electro Wizard + Wizard behind a tank: +3 elixir
- Baby dragon + mega minion behind a golem: +1 elixir
- Ebarbs + fire spirits rushing your tower: +2 elixir
- Elixir collector: 0 elixir
- Sparky: 0 elixir
- Wizard: -1 elixir
- Witch: -1 elixir
Goblin Gang
The Goblin Gang is an extremely powerful swarm card for 3 elixir. It gives you 3 spear goblins behind 3 regular goblins (which would cost 4 elixir altogether, normally). An undefended goblin gang will take almost half a crown tower’s life. This won’t happen too often as your opponents will know to rightly fear them, and because they are so powerful defensively.
A goblin gang is a great answer to almost anything that isn’t doing splash damage (and can even work OK against those troops sometimes anyway). Their high DPS means they will make quick work of backline supports, and they can also help tear down a tank. Their best uses are generally –
- Placed on a support that’s just moved into tower range, they’ll quickly overwhelm it and either trade positively or take it out then form a menacing counter push
- Drawing a push in towards the center for both towers, making difficult trades using double tower power (e.g. against ebarbs or a lone valkyrie)
Knight
The Knight is an all-purpose mini-tank that dishes out solid single target damage for a low elixir cost. In this deck he’s mostly used defensively, where he shines at defending against troops that can deal moderate to heavy splash damage.
Some troops will quickly cut through your swarm defenses (wizards, valkyries, bombers, etc.), but not the knight. Drop him on one of these splash supports, and he’ll usually survive with a bit of health to start a counter push.
In situations where you want to go for a hard counter (e.g. goblin gang to stop ebarbs), but think your opponent will log, you can place down a knight as well. If they log the goblin gang, the knight will finish the ebarbs off with the towers for a positive elixir trade, and if not, you’ll easily dispatch the ebarbs and have a nice counter push ready to go.
The knight is the best choice in the deck to tank for a goblin barrel. If you have a counter-pushing knight, or just want to go for a strong push while your opponent’s elixir is down, fire the goblin barrel onto the tower so that by the time it hits, the knight has the tower’s attention. The goblins will get in a TON of extra damage if your opponent doesn’t have an answer.
The Log

The Log does medium damage for a low elixir cost in a large range and will knock back any unit it hits. It’s very powerful for its elixir cost, with the one major downside that it doesn’t hit air units. The Log is great for –
- Clearing swarms
- Chipping towers
- Resetting prince charges
- Defending against moderate health units
Skeletons

The Skeletons give you 4 weak skeletons with low-medium dps that will die to a stiff breeze, but at the low low cost of 1 elixir. Against non-splash troops, they’ll absorb 4 hits while your towers chunk away at enemy troops. Even against troops like hog rider or giant, they can shred enough HP to neuter a push.
At times, you may need to get specific answers back in your hand as soon as possible, and for only 1 elixir you can just fire the skeletons out to cycle your deck.
>Skeletons dropped directly on a lone defensive troop thats crossed the river (e.g. musketeer, electro wizard, wizard) will minimize or sometimes completely negate the damage they would’ve dealt to your tower, putting you up several elixir.
Inferno Tower

The Inferno Tower is a defensive powerhouse, and shores up the remaining weaknesses of the deck. Even with a splash-clearing support, the inferno tower can melt a tank before it can get to your towers. If your opponent has built up a sizable push, you may need more troops to bide some time while the inferno cuts through.
The inferno tower is great at dealing with high health splash damage troops (e.g. bowlers, executioners, valkyries) that would otherwise give this deck trouble. It will often kill them while only taking an attack or two in return, hanging around another 20 or more seconds to pick up extra elixir value.
Combos & Pushes
Barrel/Knight Push – 6 elixir
 When you’re up in elixir and your opponent doesn’t have a great counter, this is the perfect way to spend 6. The knight will start taking tower shots just as the barrel explodes, releasing 3 high dps goblins that are free to stab away.
Earlier in the game, pushing with just the Goblin Barrel is a better way to probe your opponent’s defenses with lower risk.
When you’re up in elixir and your opponent doesn’t have a great counter, this is the perfect way to spend 6. The knight will start taking tower shots just as the barrel explodes, releasing 3 high dps goblins that are free to stab away.
Earlier in the game, pushing with just the Goblin Barrel is a better way to probe your opponent’s defenses with lower risk.
Knight/Skeleton Defense – 4 elixir
The knight gives you safety from a zap/log protecting the enemy push, and the skeletons give added dps and durability against single target enemy troops. If the enemy has splash troops, make sure the knight gets their attention with placement and timing, and that your skeletons are on the other side of the attack.
Knight/Goblin Gang Defense – 6 elixir
 For heavier pushes, the knight/goblin gang works similar to the knight/skeleton, except with more bodies, more dps, and the ability to hit air (with the spear goblins).
Inferno Tower/Princess
The inferno tower is great against single enemies with high health, so your opponent may try to swarm it (with Skeleton Army, Minion Horde, etc.). If you suspect this is coming, be ready to place Princess somewhere where she can clear out the hordes and protect your Inferno Tower.
Goblin Barrel/(Princess or the Log)/Knight
If you know your opponent is likely to defend your barrel (or barrel/knight) push with a swarm troop, you can place your barrel to land at the front of the tower and drop a log or princess, either of which will clear up the swarm, chip the tower, and protect your push. This can be risky since you’re committing more elixir that won’t pay off if your opponent has a different counter that doesn’t play into your plan.
Inferno Tower vs Electro Wizard

 If your opponent has electro wizard, they’re likely to try to use it to counter your Inferno Tower. You can get around this by first making sure that your inferno can’t be hit by an electro wizard on the other side of the river, and second distracting the electro wiz as soon as he crosses the bridge while your inferno melts it’s intended target. The best troops for this are Knight, Goblin Gang, or Skeletons, but the Log can also usually buy you enough time, and Goblin Barrel will work too.
Pingback: Clash Royale Metagame Overview - ClashRoyaleMeta